Table of Contents
- Introduction
- Planning Your Floating Shelves
- Choosing Materials and Tools
- Measuring and Marking
- Installing the Brackets
- Attaching the Shelves
- Finishing Touches and Styling
- Common Mistakes to Avoid
- Maintenance Tips
- Conclusion
1. Introduction
Floating shelves are a stylish and functional addition to any home. They offer storage and display space while maintaining a clean, modern look. Unlike traditional shelving, floating shelves appear to “hover” on the wall without visible brackets, giving your room a sleek and minimalist appearance.
This guide will walk you through the step-by-step process of building and installing floating shelves yourself, with practical tips for materials, tools, and finishing touches. Whether you’re a beginner or an experienced DIY enthusiast, this guide will help you achieve professional-looking results without spending a fortune.
2. Planning Your Floating Shelves
Before starting, careful planning ensures a successful project:
- Determine the Purpose: Are the shelves for books, decorative items, or kitchen storage? The intended use affects material choice and shelf depth.
- Choose the Location: Consider wall space, height, and accessibility. Measure available space to avoid overcrowding.
- Decide on Dimensions: Standard floating shelves are typically 6–12 inches deep and 24–48 inches wide, but adjust based on your needs.
- Load Capacity: Ensure the shelves will hold the intended weight. Heavy items may require thicker boards or sturdier brackets.
3. Choosing Materials and Tools
Select materials and tools carefully to ensure durability and aesthetic appeal:
Materials:
- Solid Wood Boards: Pine, oak, or maple are sturdy and easy to finish.
- MDF Boards: Smooth surface, budget-friendly, but less durable.
- Floating Shelf Brackets: Hidden brackets designed to support shelves from inside.
Tools:
- Drill and Drill Bits
- Level and Measuring Tape
- Stud Finder
- Screws and Wall Anchors
- Sandpaper and Paint or Stain
- Pencil for Marking
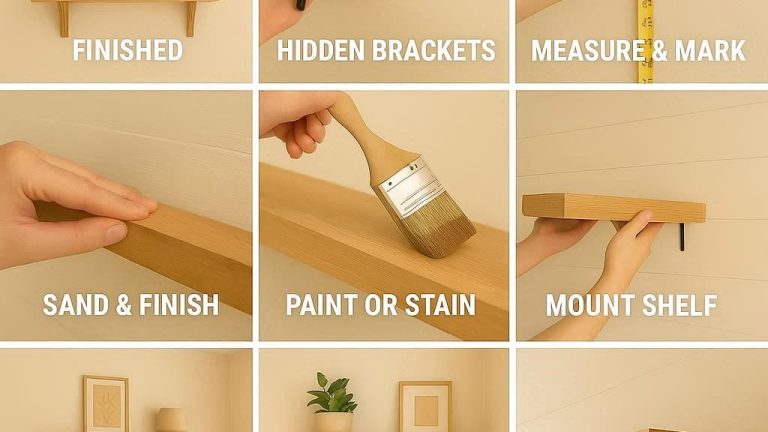
4. Measuring and Marking
Accurate measurements prevent mistakes during installation:
- Locate Wall Studs: Use a stud finder to locate studs for secure shelf mounting.
- Mark Bracket Positions: Draw horizontal lines where the shelves will sit, ensuring brackets align with studs.
- Check Level: Use a spirit level to make sure your lines are perfectly horizontal. A crooked shelf is noticeable and may affect weight distribution.
- Mark Drill Points: Indicate where screws will enter the wall and the shelf for precise alignment.
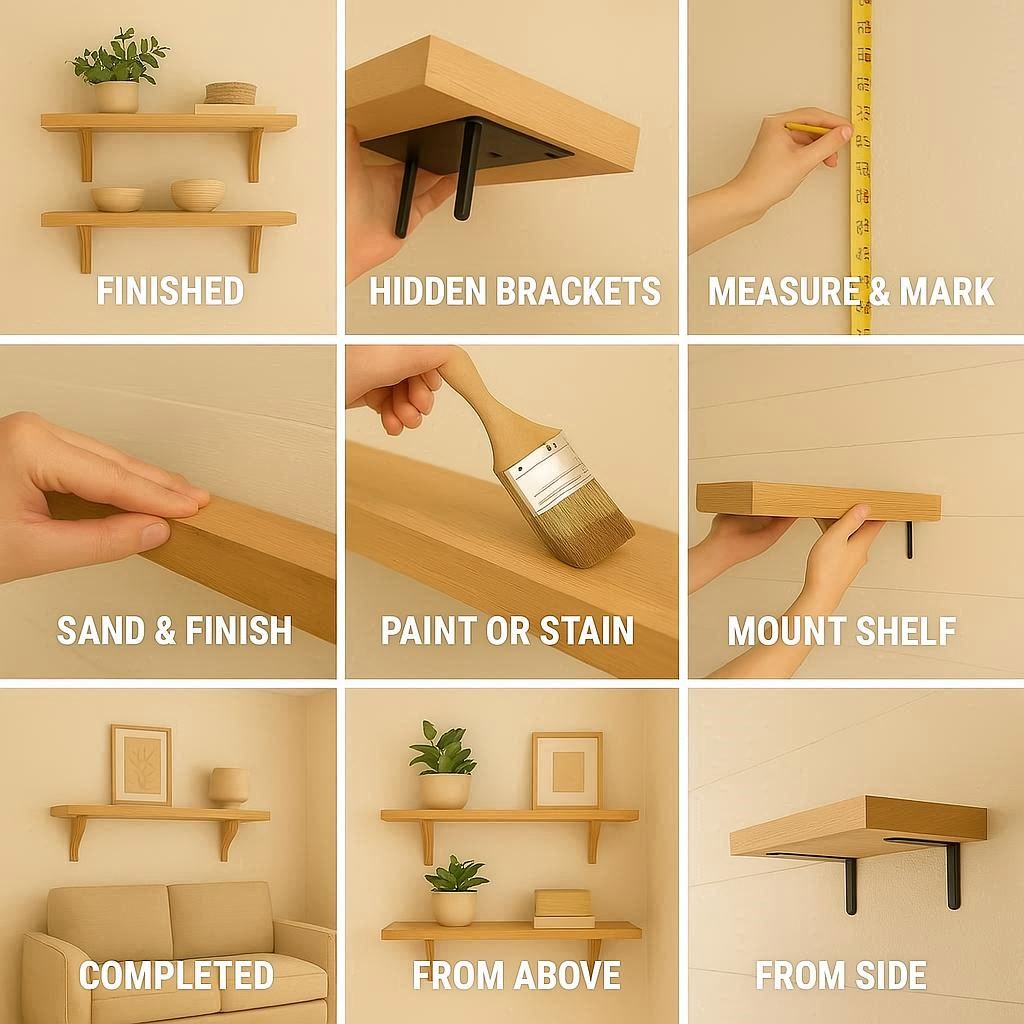
5. Installing the Brackets
Brackets are the backbone of floating shelves:
- Pre-Drill Holes: Drill pilot holes into the wall studs to avoid splitting the wood.
- Attach Brackets: Secure brackets using screws, making sure they are flush with the wall.
- Check Stability: Ensure brackets do not wiggle or tilt; a stable bracket guarantees the shelf will hold weight safely.
- Repeat as Needed: For longer shelves, multiple brackets may be necessary for support.
6. Attaching the Shelves
Once brackets are secure, it’s time to mount the boards:
- Drill Holes in the Shelf: If your brackets require screws through the shelf, measure and mark holes accurately.
- Slide the Shelf: Carefully slide the shelf onto the brackets, making sure it fits snugly.
- Secure the Shelf: Screw the shelf to the bracket if needed, ensuring it is level and flush with the wall.
- Double-Check Alignment: Use a level to confirm the shelf is perfectly horizontal.
7. Finishing Touches and Styling
A polished finish enhances the look of your floating shelves:
- Sanding: Smooth all edges and surfaces to prevent splinters.
- Painting or Staining: Apply paint, stain, or wood finish according to your home décor style. Multiple coats may be necessary for durability.
- Decorative Accents: Add books, plants, or small decorative items to personalize the space.
- Lighting: Consider small LED strips underneath shelves for a modern touch.
8. Common Mistakes to Avoid
Avoid these frequent errors for professional results:
- Ignoring Studs: Attaching shelves only to drywall can cause them to fall.
- Uneven Shelves: Always use a level before and after mounting.
- Overloading: Respect the weight limit; heavy items need extra support.
- Poor Finish: Skipping sanding or finishing can lead to rough edges or warped wood.
9. Maintenance Tips
Keeping your floating shelves in good condition ensures long-term usability:
- Regular Cleaning: Dust and wipe shelves regularly to maintain appearance.
- Avoid Excess Moisture: Water can warp wood, so avoid placing wet items directly on the shelves.
- Inspect Brackets: Check periodically to ensure screws are tight and brackets are secure.
- Rotate Decorations: Distribute weight evenly to prevent sagging.
10. Conclusion
Building and installing floating shelves is a satisfying DIY project that adds both style and functionality to your home. With careful planning, the right materials, and precise installation, even a beginner can create sleek, sturdy shelves that enhance any room. Floating shelves offer a modern, minimalist look while providing practical storage and display space, making them an ideal addition to your home décor.