Table of Contents
- Introduction
- Understanding Tile Grout
- Preparing Your Tiles and Workspace
- Choosing the Right Grout
- Mixing Grout Properly
- Applying Grout Step by Step
- Cleaning Excess Grout
- Sealing the Grout for Longevity
- Common Mistakes and How to Avoid Them
- Conclusion
1. Introduction
Grouting tiles may seem like a small part of a tiling project, but it makes a huge difference in the finished look and durability of your surface. Whether you’re tiling a bathroom, kitchen backsplash, or a decorative floor, knowing how to grout tile like a professional ensures a clean, polished, and long-lasting result. In this guide, we will walk you through DIY techniques that bring professional results without hiring a contractor.
2. Understanding Tile Grout
Before diving in, it’s important to understand what grout is and why it matters:
- Purpose: Grout fills the gaps between tiles, preventing water infiltration and stabilizing the tiles.
- Types: There are different types of grout such as sanded, unsanded, epoxy, and premixed grout. Choosing the right type depends on tile spacing, material, and usage area.
- Finish: Grout can be matte or glossy, colored or neutral. Your choice affects both appearance and maintenance.
3. Preparing Your Tiles and Workspace
Proper preparation is key to professional results:
- Clean the Tiles: Ensure all tiles are free from dust, adhesive residue, and debris.
- Check Spacing: Make sure tiles are evenly spaced with proper spacers.
- Protect Surroundings: Cover counters, cabinets, and floors with drop cloths to prevent grout stains.
- Safety: Wear gloves and safety glasses to protect your skin and eyes from grout dust.
4. Choosing the Right Grout
Selecting the right grout type makes application and maintenance easier:
- Sanded Grout: Ideal for gaps larger than 1/8 inch, commonly used for floors and larger tiles.
- Unsanded Grout: Suitable for narrow spaces, delicate tiles like glass or polished stone.
- Epoxy Grout: Highly durable and stain-resistant, perfect for areas exposed to water like showers.
- Color Considerations: Lighter colors highlight tile patterns but may show stains; darker colors hide dirt but can fade over time.
5. Mixing Grout Properly
For DIY projects, mixing grout correctly is crucial:
- Follow Instructions: Each grout type has manufacturer guidelines for mixing ratios.
- Consistency: Aim for a thick, peanut butter-like consistency. Too runny, and it will not fill joints properly; too thick, and it’s hard to spread.
- Small Batches: Mix only what you can use within 30 minutes to prevent drying out.
- Tools: Use a bucket and margin trowel or a drill with a mixing paddle for thorough blending.
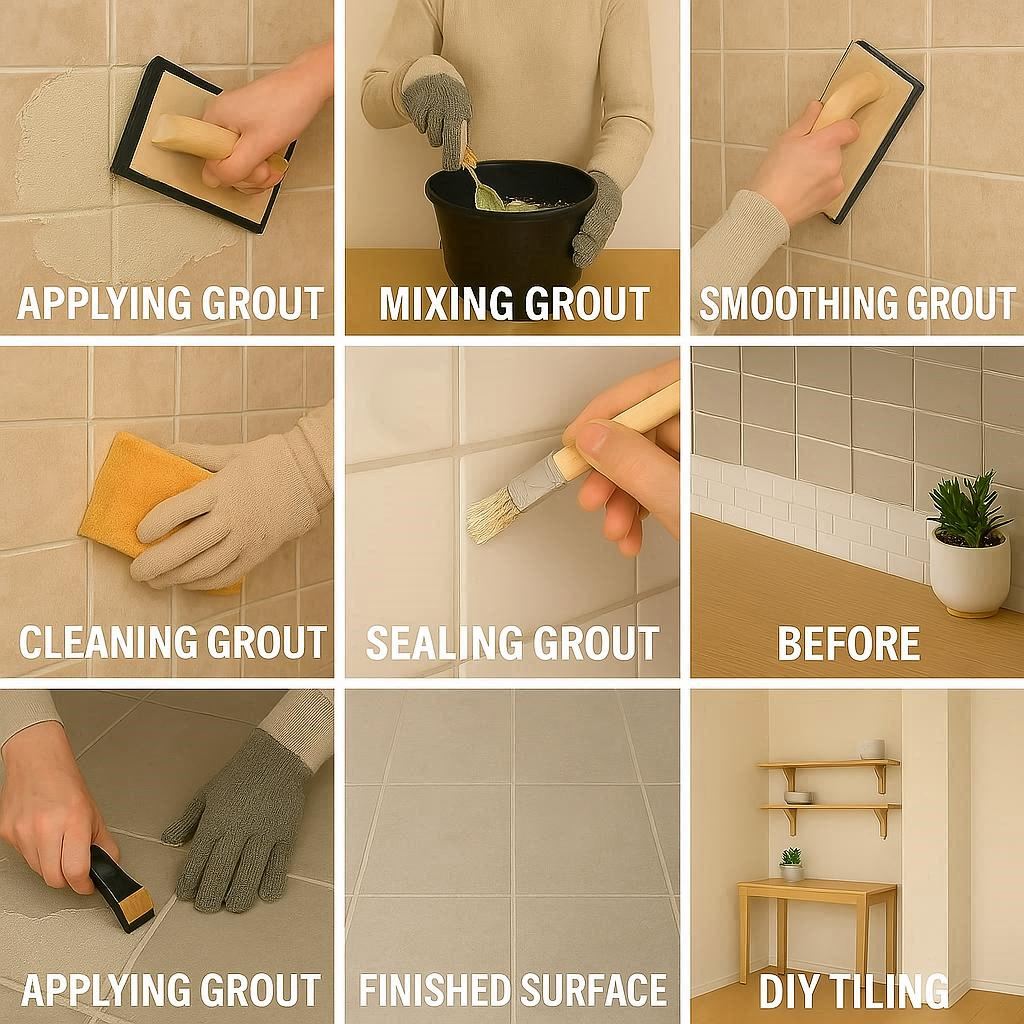
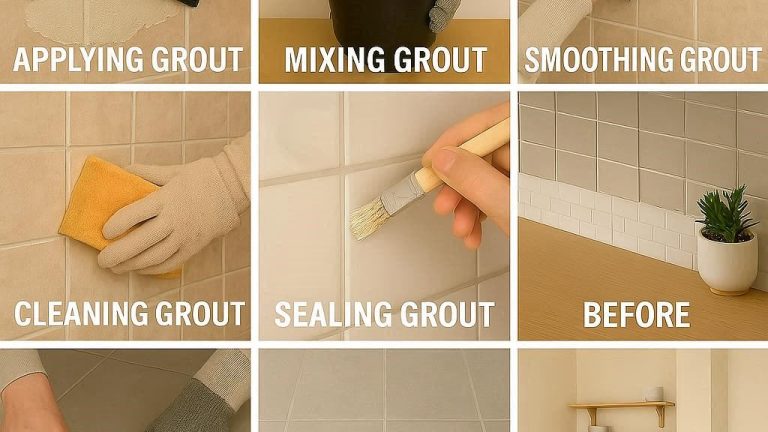
6. Applying Grout Step by Step
Professional-looking results come from methodical application:
- Load the Grout Float: Scoop grout onto the float at a 45-degree angle.
- Press into Joints: Spread the grout diagonally across the tile surface, pressing firmly to fill the joints completely.
- Remove Excess: Hold the float at a shallow angle and scrape off the extra grout from the tile surface.
- Work in Sections: Grout small areas at a time to prevent premature drying.
7. Cleaning Excess Grout
Cleaning correctly ensures a polished finish:
- Initial Wipe: After 10-15 minutes, wipe tiles with a damp sponge to remove grout haze. Rinse the sponge frequently.
- Shape the Joints: Smooth the grout lines with the edge of the sponge or a grout finishing tool.
- Final Clean: Once grout dries slightly, use a soft cloth to buff off remaining haze. Avoid using excessive water to prevent weakening the grout.
8. Sealing the Grout for Longevity
Sealing protects your work and makes maintenance easier:
- Choose a Penetrating Sealer: Apply using a brush or applicator bottle, focusing on the grout lines.
- Multiple Coats: Two coats often provide maximum protection, allowing drying time in between.
- Regular Maintenance: Reapply sealant every 1-2 years, depending on the area’s usage.
9. Common Mistakes and How to Avoid Them
Even experienced DIYers can make mistakes. Avoid these pitfalls:
- Skipping Tile Cleaning: Dirty tiles result in uneven grout adhesion.
- Using the Wrong Grout: Unsuitable grout can crack or discolor.
- Overwatering or Underwatering: Affects strength and curing.
- Ignoring Drying Times: Patience is key; rushing can damage the finish.
- Not Sealing: Unsealed grout stains easily and deteriorates faster.
10. Conclusion
Grouting tiles like a professional is achievable with the right knowledge, preparation, and technique. By understanding grout types, properly mixing and applying it, cleaning excess carefully, and sealing for protection, you can achieve a polished, durable, and attractive tile surface. Whether you’re tackling a backsplash, floor, or shower project, these DIY techniques ensure your work looks professional while saving time and money.